This paper briefly describes the design principle and software interface design features of the AC servo system PC debugging software. It introduces the functions of the software in the AC servo system debugging process and solves the versatility of the CNC system software to the servo system. The key issue.
The servo drive device is an important part of the numerical control system. It is used to realize the feed servo control and spindle servo control of the CNC machine. Its function is to convert the command information from the numerical control device into the machine tool execution components after power amplification and shaping. Linear displacement or angular displacement motion. Since the servo system is the last link of the CNC machine tool, its performance will directly affect the technical indexes such as the precision and speed of the CNC machine tool. Therefore, the servo drive device is required to have good fast response performance, and accurately and sensitively track the digital command signal sent by the numerical control device. And can accurately execute the instructions from the numerical control device, thereby improving the dynamic following characteristics and static tracking accuracy of each motion axis of the machine tool.
The servo servo system (Servo Self Test Tools) developed in this paper mainly performs on-line debugging and diagnostic operation of the machine equipped with the Huazhong 8-type CNC system, and can also be used as a tool for offline data analysis.
1. AC servo debugging software design
A large amount of data is generated during the operation of the machine tool. The current signal as the most important data objectively reflects the machining status and performance of the machine tool. The servo debugging software is used as the comprehensive debugging software for the servo control motion axis. It mainly collects current signals, comprehensive command information and G code. The running track can monitor the actual displacement value of the coordinate axes of the machine axes (see Figure 1).
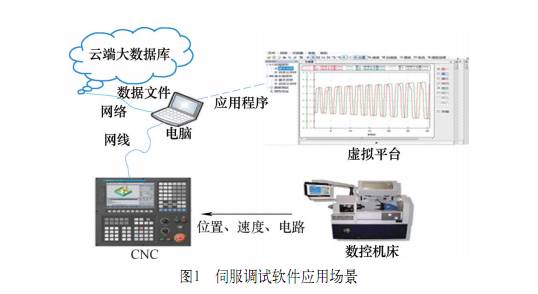
The servo debugging software can intelligently analyze the collected data, and provide the rationalization parameter values ​​to the numerical control system engineering personnel through the debugging software function interface dialogue window. At the same time, the data collected by the servo debugging software can also be automatically uploaded to the “cloud serverâ€. All the data is centrally stored in the “cloud data centerâ€. The R&D engineers can analyze the collected data in real time, which is convenient for quickly solving the user's field problems.
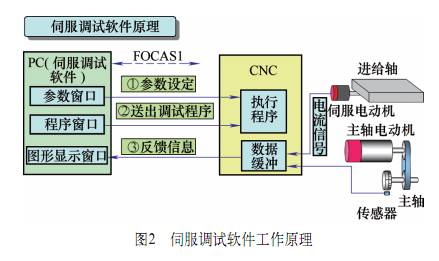
The working principle of the servo debugging software is shown in Figure 2. Firstly, the relevant parameters are set by the parameter window. The program window sends out the execution debugging program, and then the feedback information is obtained through the CNC data buffer, which is displayed in the graphic window. Finally, the above method is repeatedly debugged until Adjust the servo and spindle parameters to the best.
2. Servo debugging software interface design features
(1) Data sampling: Provides users with fast basic data (position, velocity and current) sampling and user-defined data (arbitrary data) sampling. The debugging software will display the data to the user in time domain waveform or command domain waveform. .
(2) Measurement function display: including roundness test, rigid tapping test and contour test. In the roundness test mode, the circular error waveform of any two axes and the corresponding quantization index can be output; in the rigid tapping test mode, the time domain waveform diagram of the rigid tapping synchronization error and the corresponding quantization index can be output; in the contour test mode, It is capable of outputting contour patterns of any two axes in a two-dimensional plane.
(3) Graphic operation: The user can scale the waveform, partially select the zoom and play back, and perform global and local analysis on the sampled feature points.
(4) Data analysis: The debugging software will draw the corresponding waveform curve and intelligently analyze a series of quantitative indicators according to the waveform data. For example, under the basic sampling, the tracking error, velocity fluctuation, acceleration and fast-moving plus and minus acceleration will be output. The index of the minimum value, such as the servo mismatch degree and the axis acceleration/deceleration time are output under the roundness test; the maximum and minimum synchronization errors of the Z axis and the C axis are output under the rigid tapping.
The user can modify the parameters of the CNC system and the servo drive through the waveform curve and the indicator data. The sampling adjustment is carried out several times, and the parameters of each movement axis of the machine tool are continuously optimized, so that the machine tool can achieve a better running state and a better quality part model can be processed.
(5) Parameter adjustment: Support online reading of CNC system parameters and parameter data adjustment.
(6) File import and export: The user can save the sampled data and import the sampled data file in offline mode for observing the waveform and performing arbitrary data zooming on the waveform for data analysis.
(7) Graphic comparison: Supports the comparison of graphic data of two oscilloscope files, and also supports the comparison of data waveform files collected online with data waveform files saved offline.
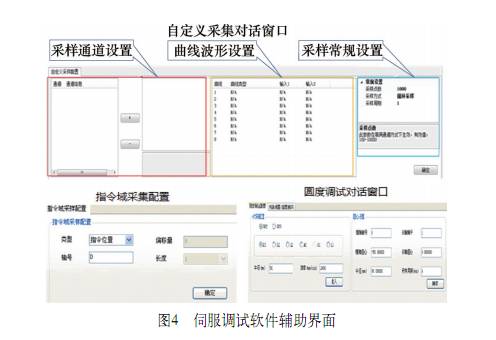
The servo debugging software initialization interface and auxiliary interface are shown in Figure 3 and Figure 4.

3. Servo debugging software function
The servo debugging software can collect various information of the servo drive device: speed loop, position loop, roundness debugging, rigid tapping, trap, gantry synchronization, spindle lifting speed, inverter rigid tapping, tool change time, custom graphics Data information for functions such as sampling, full-closed diagnostics, diagnostic logging, and tuning reports.
The "three-ring" control of the servo control system is current control, speed control and position control from the inside to the outside (see Figure 5).
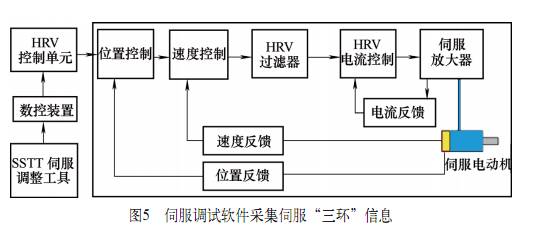
Therefore, the servo acquisition software first collects the data information of the current loop, the speed change and the position loop. According to the data information, the engineering personnel debugs the numerical control system and the drive parameters, that is, reasonablely improves the servo gain, ensures that the servo system does not oscillate, and makes the servo system and the numerical control device work harmoniously under high response and high rigidity; secondly, the servo debugging software collects. The acceleration and deceleration time constant of the servo control running axis, the engineering personnel debug the numerical control system and the drive parameters according to the data, and realize the high speed and high precision when machining the machine parts.
After stable operation under the high rigidity of the servo "three rings", the relevant event constants are set correctly. It is necessary to continue to run the servo debugging software to collect the machining error information of the typical parts, so as to ensure the machining accuracy when the servo and the mechanical are matched. The verified machining shapes are round, square, and a 90° fold line with a 1/4 arc.
(1) Use the servo debugging software for roundness debugging, covering the adjustment of roundness, size and quadrant.
Roundness adjustment: When machining an arc shape, the contour of the circle is elliptical. The main reason is that there is a dynamic mismatch between the two axes of motion. The reasons for causing this problem in the parameters include the following aspects.
1 The type and size of the two-axis acceleration/deceleration time constants involved in the interpolation are inconsistent (including the pre-interpolation/interpolation in the high-speed and high-precision modes in the normal mode).
2 Whether the feedforward function is used or not, whether the feedforward compensation coefficient is consistent.
3 Position proportional gain setting is consistent. The engineering personnel applied the servo debugging software to collect data on the above factors affecting the roundness. At the same time, the data was analyzed by the servo debugging software, and the parameters affecting the roundness were adjusted to ensure the size of the processed roundness parts was qualified (see Figure 6).
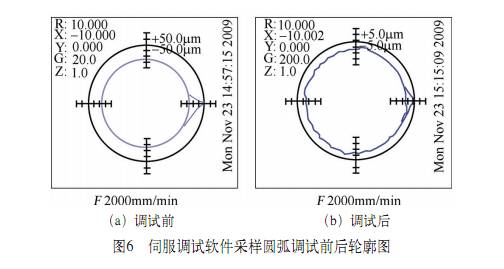
Roundness adjustment: roundness, relative roundness problem, generally has little effect on machining accuracy. The cause is mainly the machining shape error caused by servo lag. The servo debugging software can be set by feedforward compensation function. The smaller interpolation time constant is determined to improve the machining shape error caused by the servo lag.
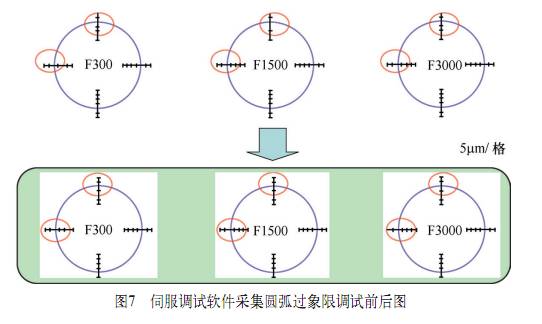
Adjustment of circular quadrant: The adjustment of circular quadrant is a difficult place in servo adjustment. In actual machining, there are many reasons for quadrant stripe in the position where the quadrant is processed. The reason for the occurrence of the quadrant is that during the transmission process of the feed axis of the machine tool, due to factors such as backlash and friction, the motor will cause hysteresis in the reverse motion, resulting in processing delay. At this time, the quadrant transition of the machining arc remains. Lower raised stripes. The engineer uses the servo adjustment software to adjust the backlash acceleration. The first step is to adjust the position loop and speed loop gain of the machine feed axis to a reasonable value. In the second step, set the backlash plus or minus compensation amount to the speed loop. In order to improve the hysteresis caused by the influence of the transmission link of the motor, the amount of deviation in the reverse position is reduced (see Figure 7).
(2) Using the servo debugging software to debug the square machining precision.
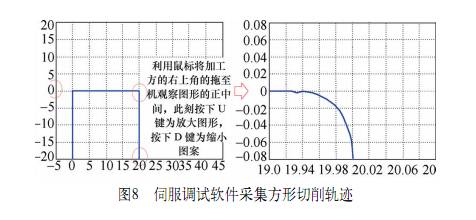
Where corners appear during square machining, both faster processing speed and better processing quality are required. The two need to find a balance point. At this time, the data is collected by the servo adjustment software, and the engineer selects reasonable parameters to ensure high-speed and high-precision parts processing (see Figure 8).
(3) Use the servo debugging software to perform circular arc trajectory with 90° fold line and 1/4.
The arc program of 90° fold line and 1/4 is mainly used to confirm the machining accuracy at the transition point from straight line to arc or arc to line tangency. The system mainly uses the arc radius deceleration function to confirm the relationship between speed and precision.
4. AC servo debugging software application
The servo debugging software has been applied to the debugging of the user's on-site machining machine, the debugging in the automatic production line, and the intelligent manufacturing workshop. At the same time, the servo debugging software has also been applied in the reliability experimental environment of continuous operation for a long time. When the servo debugging software is used for user on-site debugging, it mainly meets the requirements of high-speed and high-precision cutting of user parts. At the same time, it can collect problems that occur when users process, and use intelligent sensing technology and cloud computing technology to collect information and upload it directly to the network. Cloud Data Platform" as the basic information of big data. When other users have similar problems, the customer service can solve the user's problems reasonably and quickly according to the big data platform information.
In the reliability test, the servo debugging software collects the actual running position of the servo-controlled motor, and can also collect the current signal of the servo drive. The test engineer regularly checks the data information of the machine tool or the electric cabinet in the reliability test, which is convenient for monitoring the whole machine of the numerical control system. Operating status.
The automated test system will be applied in the intelligent manufacturing demonstration factory in the future. The servo debugging software will monitor the correctness of the G code module in the actual production process and the stability of the function module when it is continuously used through the mobile APP or the web homepage. It can also be monitored. To the operation status of each CNC machine tool, to ensure the safety and reliability of intelligent factory parts processing.
5 Conclusion
The servo debugging software is easy to connect and has rich data collection information. It can meet the monitoring of various operating conditions of the servo system, such as the display of actual position, speed and current signals, and provide convenient and quick debugging means, that is, providing data information changes in real time through the software interface. The engineers rely on the servo debugging software to quickly solve the problems that appear on the user's site, and at the same time ensure that the CNC machine tools have stable machining performance and safe and reliable machine operation in the actual production environment. The collected data of the servo debugging software will directly upload the “big data center in the cloud serviceâ€, and control the health status of the machine tool through the vertical comparison of the historical data of the stand-alone machine and the horizontal comparison of the machine cluster data to realize the health protection of the machine tool. Servo debugging software can be widely used in many industries of intelligent manufacturing.
Fiber Optic Attenuator, Fiber Optic Attenuators, Fiber Optic Adapter Hybrid Attenuator, SC Optical Fiber Attenuator, FC Optical Fiber Attenuator
NINGBO YULIANG TELECOM MUNICATIONS EQUIPMENT CO.,LTD. , https://www.yltelecom.com