As mobile phones, PDAs, and digital cameras increasingly use color LCD displays, white LEDs have become a common source of illumination. Monochromatic displays can use electroluminescent backlights or color LEDs as backlight sources, while color displays require white light sources to display colors correctly.
There are two main ways to provide white light sources: white LED and CCFL (cold cathode fluorescent lamp). CCFL has been used in notebook computers for many years. However, considering the size, complexity, and cost advantages of light sources, white LEDs have become the preferred light source for small handheld devices.
White LEDs require only a low DC voltage (between 3V and 4V), which means that they can be powered by simple circuits based on inductance or capacitance. In contrast, CCFL requires a very high AC voltage (200VRMS to 500VRMS) for power supply, which is costly and bulky, and requires transformer-based circuits (Figure 1).
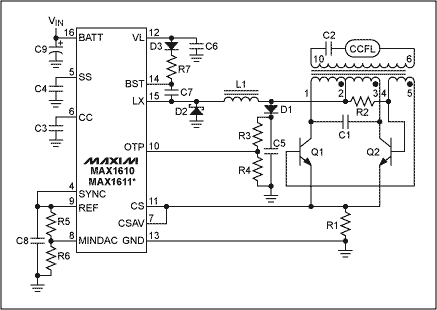
Figure 1. The CCFL circuit requires a transformer to provide high voltage to the fluorescent tube.
The forward voltage drop of red and green LEDs is 1.8V to 2.4V (typical), and some commonly used batteries can provide a high enough voltage to directly drive these LEDs. However, white LEDs have a forward voltage drop of 3V to 4V (typical) and usually require an independent power supply.
The light intensity driving the LED is related to the current flowing through the LED. The larger the current, the higher the light intensity. The current at full brightness output is about 20mA. Digital cameras and cellular phones generally require 2 to 3 LEDs, and PDAs generally require 3 to 6 LED backlights.
LEDs can be driven in parallel or in series, as shown in Figure 2. The disadvantage of the parallel connection is that the LED current and brightness cannot be automatically matched. The series connection maintains the inherent matching characteristics, but requires a higher supply voltage.
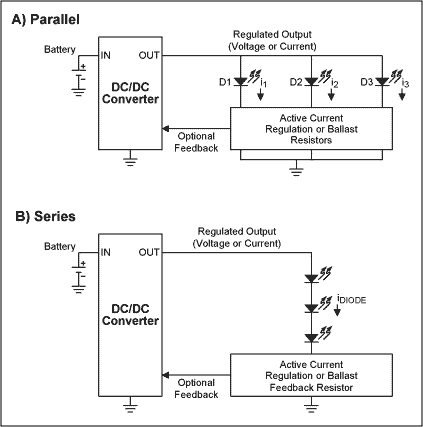
Figure 2. Method A (LEDs connected in parallel) requires a lower voltage; Method B (LEDs connected in series) provides the best match.
Regardless of the parallel or series connection, the battery voltage of most handheld devices is not sufficient to drive LEDs, so a boost converter is required. Charge pump converters use small capacitors to achieve voltage conversion with the smallest size and lowest cost. However, the charge pump converter can only generate multiples of the input voltage (eg 1.5 times, 2 times). Therefore, series-connected LEDs usually require an inductor-based converter. With an inductor-based converter, a higher boost ratio can be easily achieved, and it can maintain high efficiency over a wide input to output voltage range.
Driving parallel LEDs Figure 3 shows the three main methods of driving parallel LEDs:
Use the existing power supply to independently regulate the current flowing through each LED. Only adjust the power supply voltage, and rely on the consistency of the LED and the series resistance to match the current. Regulate the current flowing through an LED, and rely on the consistency of the LED and the series resistance to match the current of the remaining LEDs.
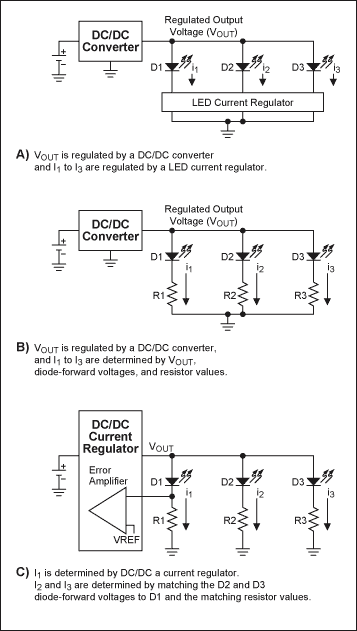
Figure 3. The figure shows three methods for driving parallel LEDs: A) independently adjust the current of each LED; B) adjust the output voltage, relying on the consistency of the LED and the series resistance to match the current; C) adjust the flow through a The current of the LED depends on the consistency of the LED and the series resistance to match the current of the remaining LEDs.
Method A. Independently adjust the current flowing through each LED. If the integrated LED current regulator has a sufficiently high power supply to drive the LED forward, then only the current control circuit needs to be designed, and sufficient current can be provided to drive the LED at full brightness. All LEDs.
The circuit shown in Figure 4 uses the MAX1916 to drive three white LEDs at a constant current, which is a low-cost solution for matching LED brightness. The absolute current is set between the required maximum brightness current of the LED and the maximum rated current; in order to keep the display brightness consistent, the current matching must be good enough. The typical current matching degree is 0.3%, and the absolute current accuracy is ± 10%. The voltage difference of each output is less than 410mV to maintain 20mA current. In this way, only 4.2V can drive 3.8V LED. The LED pin current is set to 230 times the current flowing into the SET pin. To provide bias current to the SET pin, RSET needs to be connected to a voltage greater than the 1.215V SET pin bias voltage.
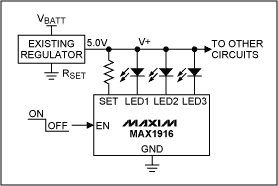
Figure 4. The MAX1916 is available in a SOT23 package and provides 0.3% current matching.
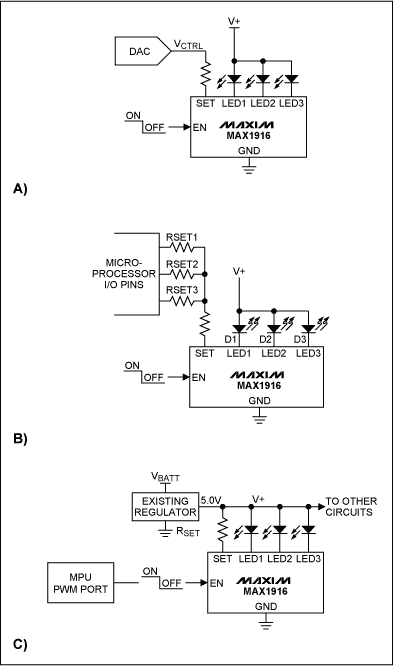
Figure 5. Three current regulation methods when the MAX1916 drives white LEDs.
There are many ways to dynamically adjust the brightness of the LED, as shown in Figure 5.
One method is to use DAC to drive RSET (Figure 5A). The LED current is a function of the DAC output voltage minus the SET pin bias voltage. DAC can choose the low-cost MAX5360-MAX5365 series in SOT23 package.
Using the I / O pins of the controller to control multiple resistors, a simple brightness regulator can be formed, as shown in Figure 5B. Switch the control pin between high (on) and tri-state (off) to get the required SET pin current.
The last method is to use logic level PWM signals to drive the ENABLE pin (Figure 5C). Many processor ports can provide low-frequency PWM signals with a duty cycle from 0 to 100%. The response time of the MAX1916 ENABLE pin allows PWM operation at frequencies up to about 2kHz.
Integrated charge pump booster power supply and current regulator If the existing power supply of the system is not suitable, you need to choose a dedicated LED power supply. The low-cost MAX1574 / MAX1575 / MAX1576 charge pump controller combines boost power supply and current regulation. These devices have higher output current, good current matching and higher operating efficiency, and can provide adaptive mode switching, overvoltage protection, and can drive 8 LEDs.
The adaptive switching circuit detects the input voltage and determines the most efficient boost ratio (for example, 1x, 1.5x, or 2x). Using a series of pulse codes, through the Dual Mode â„¢ enable pin, the brightness can be adjusted (equivalent to a percentage of the set current).
The MAX1574 charge pump shown in Figure 6 can drive three LEDs with a total current of up to 180mA. The 1MHz switching frequency allows the charge pump to use small ceramic capacitors.
The MAX1576 charge pump shown in Figure 7 can drive two groups of four LEDs with a total current of up to 480mA. For the LED group in the blinking state, the current of each LED is allowed to reach 100mA. Each group of LEDs has independent current setting, pulse brightness adjustment and 2-wire brightness control. Using adaptive switching, the average efficiency of a single lithium battery during the entire discharge process (Figure 8) can reach 83%. For digital cameras using LED flash, the MAX1576 is ideal.
MAX1575 is another chip of this series, which can drive two groups of LEDs (four main screen LEDs and two sub-screen LEDs) with a total output current of 120mA.
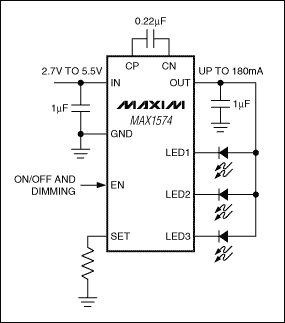
Figure 6. MA1574 charge pump providing a set of LED current sources
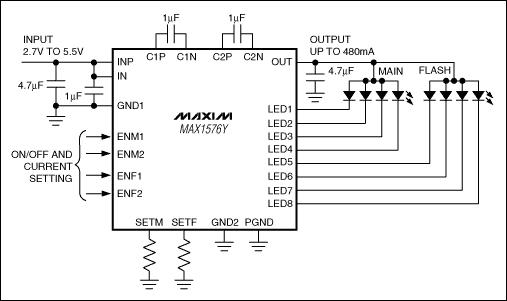
Figure 7. MA1576 charge pump with two LED current sources
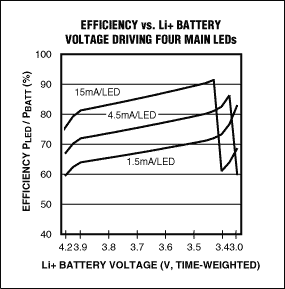
Figure 8. Efficiency of MAX1576 at typical lithium battery voltage
Method B. Using a regulated output power is similar to Method A. If there is an existing voltage source in the system, Method B can be used. Method B is very economical, but the current accuracy is not as good as Method A. Since method B cannot achieve steady current, the absolute current flowing through each LED must be maintained between the required maximum brightness current and the maximum rated current of the LED. The current matching must be good enough to maintain uniform brightness.
Referring to Method B in Figure 3, the current through any LED can be determined by subtracting the forward LED voltage (VD) from the output voltage of the power supply (VOUT) and then dividing by R:
I = (VOUT-VD) / R (Equation 1)
Figure 9A shows the IV curve of two white LEDs in a typical handheld device. At the same current, the diode voltage is not equal. Figure 9B shows the voltage difference between white LEDs as a function of current.
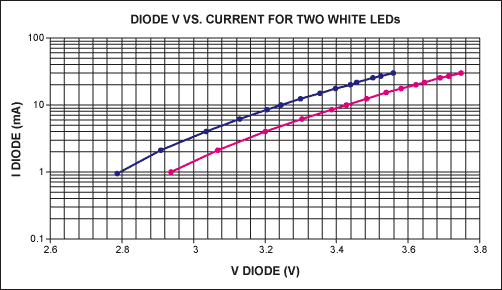
Figure 9A. IV curve of two white LEDs in a typical handheld device
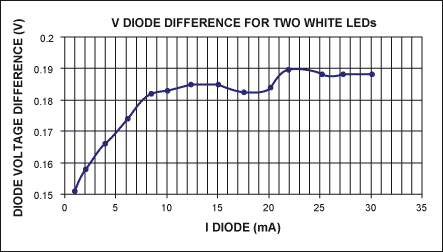
Figure 9B. Correspondence between voltage difference and current between two white LEDs
LED current matching In order to understand the impact of the forward voltage matching degree on the current matching degree, the ratio of the LED current can be calculated using Equation 1. For example, the ratio of I1 to I2 is:
I1 / I2 = R2 / R1 ((VOUT-VD1) / (VOUT-VD2)) (Equation 2)
Assuming R1 = R2, Equation 2 can be simplified to:
I1 / I2 = (VOUT-VD1) / (VOUT-VD2) (Equation 3)
When VOUT is very large, the result of Equation 3 tends to 1. Therefore, a higher VOUT helps to get a better current matching. R must increase in proportion to VOUT-VD in order to maintain a constant current. The loss caused by higher VOUT is the greater the power consumed by R. There is a trade-off between efficiency and current matching.
For example, to drive a 3.60V LED with a 5V power supply, the voltage on R is 1.40V. If you change to a 3.42V LED, the voltage on R increases to nearly 1.58V, and the LED current increases by 13%; it should be noted that the LED voltage only changes by 5% at this time. This example shows the need to reasonably choose efficiency and matching.
Absolute Accuracy The absolute error of the LED current in Method B in Figure 3 can be calculated using Equation 1. For the selected LED, the relationship between VD and ID (Figure 9A) is used for calculation.
Substituting the desired operating current I, the nominal VD voltage corresponding to the current I (from the figure) and the selected VOUT into Equation 1, the R value can be solved. After obtaining the R value, use the VD under the worst condition in the LED data to solve Equation 1. The effect of temperature changes on VD must be considered. In this way, the current range of the LED can be obtained, and the current range must be smaller than the maximum rating of the LED.
Brightness adjustment In method B of Figure 3, the LED current can be adjusted by changing VOUT. This method is not recommended when using the same power supply. The alternative is to use MOSFETs in parallel with the switch resistor to form a simple brightness regulator (Figure 10). However, when multi-level brightness adjustment is required, the cost of this method will increase dramatically. At this time, should consider the integrated scheme shown in Figure 6 or series drive (discussed below).
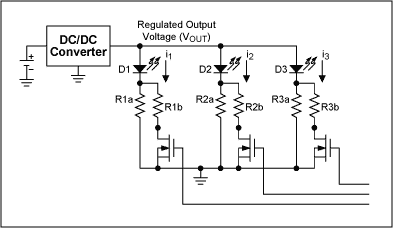
Figure 10. Using MOSFET to control resistors R1b to R3b in parallel with R1a to R3a for brightness adjustment
Method C. Use a constant-current output converter. Method C in Figure 3 shows a constant-current (rather than regulated) output converter. In this design, the current flowing through one of the LEDs is detected by the resistor R1, and the current is stably regulated by the converter. The converter type can be an inductor-based converter, or a charge pump or linear regulator.
The LED current equation is the same as Equation 1, for convenience, it is listed below:
I = (VOUT-VD) / R (Equation 4)
But the conditions are different from the previous ones, what is stable here is I1, not VOUT, the formula is:
I1 = VFEEDBACK / R1 (Equation 5)
Since only one current is adjusted, the forward voltage difference of the remaining LEDs will cause a current error, as discussed above. In addition, the scheme increases R1 according to the improved method shown in FIG. 11.
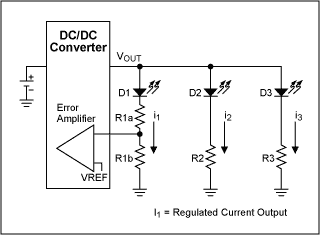
Figure 11. The current matching of the circuit shown in Method C in Figure 3 is improved by increasing R1A. For the selected current, R1B must remain constant. Set R2 and R3 to R1A + R1B.
Because the current must remain constant, R1 is divided into R1A and R1B. R1B controls the current, and R1A controls the additional output voltage, which has reached the required current matching degree. Substitute R1 = R1A + R1B into Equation 4; R1 = R1B into Equation 5. To match the current, R2 and R3 are set to R1A + R1B.
The circuit shown in Figure 12 uses the MAX1910 / MAX1912 charge pump to achieve current regulation. The brightness adjustment input is added in the figure, and all LEDs share a detection resistor in order to adjust the total current. To increase efficiency, these controllers offer 1.5x and 2x boost options. It can provide up to 120mA output current, depending on the input voltage. For details, please refer to the data sheet.
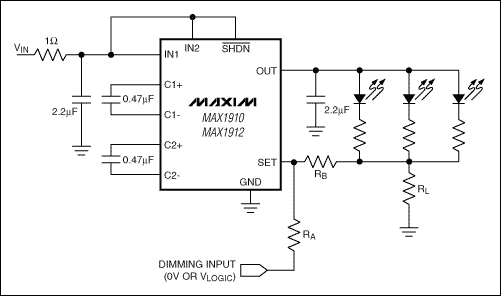

Figure 12. MAX1910 / MAX1912 with brightness adjustment control
Driving series LEDs When driving white LEDs in series, since the current flowing through each LED is the same, uniform brightness can be obtained. The disadvantage of this design is that the forward voltage drops add up and require a higher drive voltage. This configuration requires an inductor-based converter to achieve high efficiency at high voltages. When selecting this type of converter, the rated output voltage of the Lx pin must be considered.
There are several models that can drive different numbers of LEDs in series based on the rated voltage of their Lx pins, as shown in Table 1. There must be a certain safety margin between the maximum rated voltage of the Lx pin and the maximum voltage of the LED string to allow overvoltage shutdown.
Table 1. Select the appropriate device to drive the series LED required
| PART | Lx PIN RATING (V) | # SERIES LEDs | PACKAGE |
| MAX1848 | 14 | 3 | 8-SOT23 |
| MAX1561 / MAX1599 | 30 | 6 | 8-TDFN |
| MAX8595Z / MAX8596Z | 37 | 8 | 8-TDFN |
| MAX8595X / MAX8596X | 40 | 9 | 8-TDFN |
For example, the MAX8596Z is a switching regulator specifically designed to drive up to eight white LEDs in series (Figure 13). The device has an input voltage range of 2.6V to 5.5V, allowing a single lithium battery or three NiCd / NiMH batteries to power the IC. The MAX8596Z is available in a space-saving 8-pin TDFN package. Working in high-speed 1MHz PWM mode, therefore, allows the use of small external components. The 32V to 36V overvoltage latch threshold can effectively protect the IC when an open LED occurs. In addition, the device also has a high-temperature derating function. When the temperature exceeds 42 ° C, the output current is reduced to reduce the power consumption of the LED.
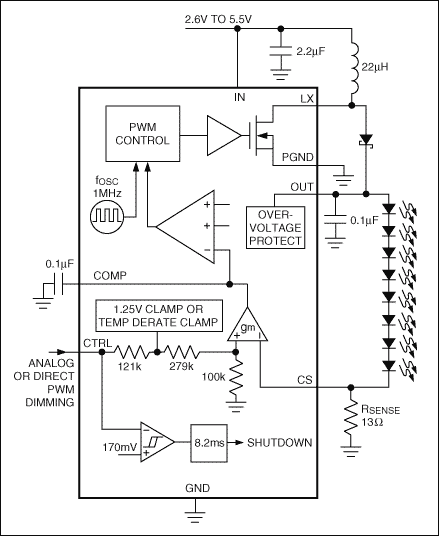
Figure 13. The MAX8596Z switching regulator drives up to eight white LEDs in series
Drive the CTRL pin with any DC voltage or unfiltered PWM signal to adjust the LED current. The 0.24V to 1.72V CTRL pin voltage drives the LED from the darkest to full brightness. When it exceeds 1.72V, the output current is clamped to the maximum value. PWM signals from 200Hz to 200kHz can be used. Error signal amplifiers and compensation capacitors are used for PWM signal filtering without input filters.
The efficiency when the MAX8596Z drives different numbers of LEDs is shown in Figure 14. The maximum efficiency exceeds 85%.
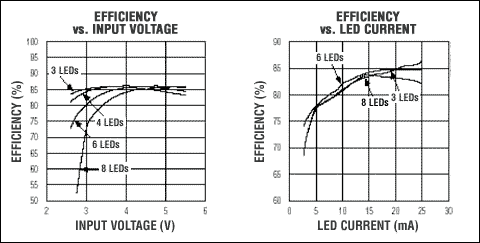
Figure 14. Efficiency of the MAX8596Z in the circuit shown in Figure 13.
LED Architectural Lighting are decorative, contemporary lighting fixtures for architectural projects,it combine architectural form and versatility to make an excellent choice for new construction or retrofit applications.
Our Architectural Lighting have including: Led Wall Washer ,Led Flood Light, led linear washer,Led Linear Light, Led Wall Light ,led strip light,etc.. Products are developed and designed to hug and highlight architectural shapes perfectly and formed to fit a wide variety of projects.And at the same time offering enormous savings in energy use.With high efficiency,long life LED,multiple color function, our architectural lighting will deliver exceptional performance for the illumination and decoration of the building structures.
Led Architectural Lighting,Architectural Lighting,Architectural Area Lighting,Commercial Exterior Lighting
Guangdong guangzhidian lighting Co., Ltd. , https://www.gzdlighting.com